Tuesday, September 28, 2010

Holy crap!  I can't believe it's been three weeks since I updated!

I had a week off, there were some things going on that weekend and I needed a break.  However, I've gotten one arm completely worked out, and I'm beginning to see the thing take shape.

The first week, I finally bit the bullet and re-made the foot that was crappy.  Our friend Tim came by while we were working and took some pictures, I'll put them up when I have access to Facebook.  I didn't realize how frigging heavy these things are.  You really can't imagine how much work it is to walk in them until you try it.  It's pretty rough.  I think for the next version or whatever, I'm going to put some real consideration into making more things out of foam and coating them with some sort of sealant for permanence, rather than trying to make them out of sturdy stuff.  It's a lot of weight, and I can already tell that I'm going to be spending a lot of time standing in one place rather than trying to lug myself around all over.  Beyond that, it's pretty tough to walk on any surfaces that aren't flat or level.  I managed to walk in some grass to see if I even could, and I didn't fall, but I did have a couple close calls.  It is scary, I'll tell you.

Anyway, once I figured out how to make the arms look a bit thicker, I worked on making them light up.  I'm not wired up yet, but I did test run the arm with lights in it and it looks pretty cool.  We'll get there eventually, and I'll have to get some battery packs to power the lights.  They are pretty expensive, so I've been hesitating on spending a bunch of money on them.  I've got enough to get the arms lit, but I'd like to do a few other places, too.  Maybe Curtis will have some leftovers... yeah right.  The kid's costume lights up like a frigging Christmas tree.

So, here's the arm after painting layer 1:


You can see that the paint has a pretty nice color, it's the Krylon hammered metal textured paint.  It looks pretty awesome on the forearm, and although the upper arm looks a little lame right now, it's going to have a lot more detailed work on it later on.  The claw isn't perfect yet, it needs at least one more coat, but it still works and the new color makes it look intense.  If you look close at the upper arm in the first picture, you can see the tape line running down it, masking where the lights will be.  There's two bars, one on the inside and one on the outside of the arm.

The process for figuring out how to get the shell attached to the arm was actually a pain in the butt.  I ended up using hot glue on the wrist section (an Ice Tea bottle), which has since come undone.  I'll either try to fix the glue, or pick up some epoxy, although I didn't have much success with that last time I tried it.  The next section was easier, since the soda bottles are basically locked on via the mouth.  The thick section that covers my hand grip is a modified small garbage can, which was a tough one.  I ended up gluing a small piece of 1/2" PVC to the arm cut to the correct length, and gluing a 2 liter bottle cap to the shell.  These fit together quite nicely, and gave a sturdy attachment point for the shell.  I'm thinking this is worth remembering, since it worked out.  The final portion before the elbow is another soda bottle, and then of course three more go up the bicep.  I'll be using some conduit to connect the upper and lower arms to make it look better, along with detailing work on the upper arm.  I'm very optimistic on the look of this once it's done.

I still haven't figured out what to end the other arm with.  It's getting on toward the point of no return, so hopefully i come up with something soon.  More to come, stay tuned.

Tuesday, September 7, 2010

Much work done this weekend, although by the end of it I felt like I hadn't really accomplished much at all.  Still, I had at least two breakthroughs that felt like "Eureka!" much in the same way as when I first clamped PVC onto the bike frame.  Before I get to that, here's the pic I promised a while ago of the feet complete minus the shoes:


They look pretty good, if I do say so myself, even if they are completely different shapes and sizes.  I don't really care anymore, especially considering how frigging difficult they were to make in the first place.  I'm sure you can tell which one I made first and which one had all the mistakes from that one worked out...

Here are a slew of pictures from my work this weekend.  First, I've finally figured out how to make the arms thicker than a half-inch piece of PVC.  The solution - 2liter soda bottles.  Turns out the mouth of the bottles is exactly the same width as the PVC.  Eureka number 1.


I'm still tinkering with how exactly to blend the thickened segments into the joints without it looking forced, but that will come with more time.  The good news is that since the bottles are clear, I can light them up from inside, and exclude portions from painting to make it glow through.  It should look pretty cool.  Unfortunately, that's a ways off at this point, because that kind of detail work is simply unrealistic to me right now until I get the structure of the whole thing laid out.

Next up is the arm that includes a claw.  As promised, here are a couple pics of how I made the claw work.


In the first picture, you can see the PVC connector chain I needed to use to get the thing to fit.  It was guess work at Home Depot, since I didn't have the claw with me, but I knew how well my hand fit into it, so I figured the opening was about 4".  Turns out I was almost exactly right, and after I used the dremel tool to round out the spot in the cuff that was flat (making the hole a circle, rather than an oval), the 4" PVC connector fit perfectly.  It was a 4":2" connection, a 2":1", and a 1":1/2", by the way.  Once I got that figured out, I ran some 16 gauge wire through a hole I drilled in the trigger of the claw down through the PVC, and out a hole near the handle.  You can see this in the second pic.  I attached the back end of the wire to a strap hinge , which was set up like a trigger.  The tension on the hinge bent it, but that's fine, it doesn't really matter. This kinda worked by itself, but the problem was, it didn't reset itself since there wasn't enough tension on the wire.  I had to take it all apart and attach an extra spring inside the claw trigger to make it go back to open when I released the trigger on the handle.  Now it works awesome, and I can open and close the claw from a foot outside the cuff.  Here's one more pic of the arm attached to the chestpiece, to give you some idea of how long it is:

It doesn't really look like that anymore, because of two things.  First, I realized I need more support for the front of the arm if I don't want my wrist to break or my arm to fall off by the end of a night wearing this thing.  It's heavy on the end, and that weight only gets harder to carry with time.  The best way to do this is to attach the arm to my own near the elbow.  This is a great plan, except for one thing: The hinge at the elbow doesn't provide a good range of motion for my own elbow, and makes using the arm awkward.  The solution Curtis came up with was to find a way to let the arm swivel as well as bend.  He found an attachment for a vacuum cleaner that let this happen, but I was looking for something more elegant.  I went back to the Depot looking for a ball-in-socket joint of any type, but found inspiration elsewhere.  Enter Eureka number 2.


Yep.  It's a caster for furniture or whatever.  The top swivels just like it should, and after screwing into the wheel, the elbow flexes and bends just like it should.  This one got a "You're a genius" out of Curtis.  It was the breakthrough of the day, until he found some sick speakers to attach to his own costume.  Still, I'm pretty proud of this one.  It's going to make my life much simpler, and on top of that, it makes the elbows way thinner, so I don't have to worry about those clunky joints.

The last thing I worked on was the "jet pack" for the back of the costume.  I knew I wanted something shaped basically like a big keg, since rocket engines aren't much more than that.  I also figured I wanted it to have some sort of conical shaped thing inside, I'm pretty sure that's what they have, too.  The result of this concept is pictured below.  It's a couple of dollar store buckets connected together, along with some wire mesh garbage cans cut up and inverted into each other.  It doesn't sound like much, but it looks pretty solid, and will look even better when it isn't just duct taped together.  No, the duct tape won't be staying on the bottom or sides once I'm done.


Like I said, I'm pretty happy with this week's progress, so hopefully I can continue with that trend this next week.  I plan to order some lights, which should come in this week, and that will give me the opportunity to at least start thinking about the finished product.  It's hard to put final touches on anything till you get the wiring figured out for any lights you want to add, so I need to get them started asap.

Friday, September 3, 2010

Today wasn't a huge day time wise, I only had about two hours this afternoon to work.  It was pretty productive though, I managed to get the arm assembly attached to the Matchbox claw and get it working.  Here's a pic of the arm attached and strapped onto my real arm:


Tomorrow I'm going to try and figure out how to make 1/2" PVC look like anything but what it really is.  It should be a neat trick, since I've got no clue what I want to do yet.  I'll try to take some pictures of the trigger assembly for the claw extension and the way that I connected it to the PVC.

The upper body is starting to come together in the same way I felt the legs were, so I'm getting more and more excited.  Stay tuned.

Monday, August 23, 2010

Chest Plate, etc.

I took a couple pictures of the upper body on Friday, after I had a little time to work on it. Since other than a couple limited pics of hypothetical parts, I haven't shared any of the top half, I figure it's about time. Pardon the ghetto stance on one of them, Curtis thought it was funny.


As you can see, the top half is coming along as well.  I took the yellow pieces off the ends of the vertical part, and I'll be finishing them to look like missiles.  The back will feature a pretty large jet engine (well, it will look like one, anyway) that will light up pretty heavily, and look awesome.  I haven't decided if I want to attach wings yet, but it's an idea we're toying with.

I also figured out a very important piece of the puzzle - how to attach things to the frame.  If I use the dremel tool to cut about a quarter of the circumference out of some 3/4" PVC (imagine the profile of it resembles a C), it snaps onto the bike rack frame like a clamp.  If you look at the chest plate, you'll notice two screws where I've used this method to clamp it to the frame.  Since Friday, I've started making the mech's arms, using the same concept.  I used a T-connector to act as the initial attaching point, with the arms coming off the horizontal part of the frame at a 45* angle, and down around my shoulders.  They look pretty good so far, but I'm not 100% sure on the best way to make them movable, but secure.  I used a joint like the knee joints on the Mechs I linked to before for the shoulder joint, but I don't want to use it for the elbow too, since it makes the arms a little too flexible to easily control.  I'll keep thinking on it, I'm sure I'll figure something out.  That's the major stuff I did this week, next time I build I plan to continue figuring out the arms and possibly make the jet pack.

After that, we're left figuring out the upper legs, the lower torso, and building out the structure to be more robust.  As great as PVC is for framing, it's not very polished or intimidating on its own.  Then the finishing touches - I can't wait to light this thing up.  10 weeks till Halloween!

Friday, August 13, 2010

Mech robot costume stilts - 1st attempt

Today was a victory! We managed to get some video of the finished stilts in action, with a description of what I did to make them work. The audio is so-so since it's on Curt's iPohone, but the video shows you pretty well what the finished product will look like. I have a few pictures of the stilts right before I attached the shoes and took my first walk, I'll edit those into the post a little later. For now, take a look at this!

Monday, August 9, 2010

First Glimpses

This weekend was both productive and completely wasted at the same time.

On one hand, I managed to complete the assembly of one of the legs. On the other, I hate how it turned out, and I need to completely re-do it. This is frustrating and exhilarating all at once. Here are some pictures:


This first image is of the piston assembly that will be featured on the feet of the costume. As you can see, this part came out awesome. I'm really pleased with the look of the assembly, and Curtis was impressed enough to decide to copy them for his own stilts. He won't have the same ladder extensions, so I do worry about the stability of his feet, but that's a bridge to cross at another time.


This second image is the completed foot. It's pretty gnarly, and I think it looks really great - except for the shape of the top and bottom pieces. They both started off as squares, but as soon as I assembled the foot, I noticed that they didn't line up. This is a result of a flaw I failed to anticipate. I bought two different sized flanges, since I wasn't certain which I would like better - a 3/4" and a 1". Each of the pistons is a 3/4" on top and a 1" on the bottom. The problem is that the holes aren't positioned the same in the different sized flanges, and I can't make a template that works for all of the blocks. I had to free-hand it, and obviously that didn't work. Then I attempted to make it look less shitty by cutting away the excess portions of the blocks, but in reality it just made the whole thing look worse. I planned to just say forget it and run with it that way, but it gnawed at me and I couldn't just let it go. I plan to correct the mistake this weekend by re-doing the whole foot. On the other foot, I've planned ahead and made 1 piston entirely out of the 3/4" flanges, and the other out of the 1". This should allow me to make a template and match the feet up the right way. I may try to fix the pistons from the first foot to do the same, but I'd rather not need to paint them again and just figure something else out.


This last picture is a close-up of the "Action" portion of the feet. I don't like the wood block I used as a spacer for the ladder part - I'm going to try and find something that's round and useable instead. I kinda wish I had a bunch of AOL discs to use...

I also managed to successfully attach the bike rack to my shoulder pads. It looks really amazing. I'm starting to get pretty excited about the whole costume, now that I'm seeing pieces of it come together. I don't have any pics ready for you on that part, but as we finish up the feet and move upward I'll keep them coming.

Thursday, August 5, 2010

Last night I spent a few hours shopping for supplies and building. I've figured out a good way to make the legs function in a manner that won't result in broken bones or death, which I think is a good thing. I explained it briefly in the last post, but now that I've actually applied this guessing game to the real world, I'm gonna elaborate.

Begin with the ladder leg extensions. I've measured from the base of the foot (or, rather, the point where I'd attach it to the "foot" of the costume), and up to the top of the bracket. This is about 12". I've purchased 2 metal flanges to secure the PVC, and attachments so the PVC can screw into them. Measured these assemblies, and cut a tube of 1" PVC to fit the height. I then cut a 1.25" tube to act as the sleeve for the piston, and will attach that as a decorative piece to the outside of the 1" pipe. You can see some of the pieces here:


This picture is missing the 1" pieces, but the rest is all there. The next step is to paint the pieces the appropriate color. I bought some Rustolium textured grey spray paint that I'm pretty sure I'll use over most of the skeleton, and some really shiny chrome paint to use for the pistons. Here's the assembly in paint:


As you can see, there will be a pretty stark contrast in color, which should make a cool effect. I'll be checking to see if any more coats are needed probably tomorrow, and then I'll begin to assemble the base of the legs. I'm still trying to decide on what to make the horizontal pieces out of, since plywood is super heavy. A firm (relatively thick) plastic piece would be great, but I'm not 100% on where to get what I'm looking for. I'm going to keep working and deal with that eventually. As for the top of the legs, I've attached another 2' section of 1" PVC (painted chrome) to the upper portion of the stilt, to extend it long enough to attach to my upper calf. This should be high enough to stabilize my footing as I walk with a bunch of crap on my feet and back.

Speaking of, Curtis found this AWESOME bike rack at the thrift store that we've been working with. It's completely replaced my idea for the chair piece and for the backpack - this thing is about 100x better. I've found a great way to attach it to my shoulderpads, so it's all systems go. I'll update with more pics and details of the process as I have more time to work.

I wish this stuff was in my garage, but Curtis shipped me a key to his place, so now I can work on my own time instead of everyone else's.

Wednesday, August 4, 2010

So this weekend, I went hunting in the barn at my parent's house, hoping to find anything of use for the costume I could get my hands on. My dad was pretty helpful, offering to help me find anything I was looking for. The problem was, I wouldn't know what I'm looking for until I found it. Ultimately the search was fruitful, finding a plastic satchel that's used for holding vacuum cleaner accessories (no idea what I'm doing with it yet, but the shape and the material are good), and a pair of these:


I'm going to modify these into the stilts for the leg section of the costume. They're really only going to bear a resemblance to their original purpose by the time I'm done with them (originally they were ladder leg extensions), because I'll need to reinforce them if I plan to not break my neck. My intention is to use 1" and 3/4" PVC pipes to create two additional supports between my feet and the ground. This will be great for a few reasons;

First, as I learned in high school shop class, cylinders are the most stable shape to support weight on. Second, using three points of contact gives me a broad enough base to feel stable on the feet and not worry about tipping one way or the other and breaking my ankle. Third, there's a way to work the PVC so that when painted, it looks like hydraulic cylinders, which means that I can maintain a cool look with them at the same time as being functional.

I've also purchased this:


I'm going to use this as the ultimate end of one of the arms. It's got an electronic open and close which I should be able to modify into an extended arm so I can control it without my hand being inside the claw. It also looks totally badass, and I'm really excited to try and incorporate it into the design.

The backpack idea has fallen through, because 1)I couldn't find either of the frame packs I thought were at my parents, and 2)Buying a new one is more expensive than I care to pay for a metal rectangle. To circumvent that issue, I've taken apart the base of a camp chair, and I'm using the cross braces and backrest to replicate the same basic principle. My next build day should consist of attaching the frame to the shoulder pads and constructing the stilts. I'll take lots of pictures.

Thursday, July 29, 2010

Welcome Back!

I've been absent for what seems like forever, and true to form, I quit about 10% of the way through my 365 project. Photography isn't really something I'm in love with, and even trying to be creative with it doesn't really make me feel much more excited about it. Some people really enjoy taking pictures of things. I'm not one of them, and that's ok.

However, I'm working on a new project and I want to share it with you as it progresses.

Since I was a little kid, I've loved Halloween. I think more than the candy, it has a lot to do with the ability to dress up in costumes and walk around and be perceived as normal. My mom is really creative when it comes to this kind of thing, and it was a ton of fun for her to help my brother and I make really awesome costumes. Of course, by help, I mean do it for us. Since I've been an adult, I've tried on a couple of occasions to make cool costumes, but for the most part, it's been a hassle. There's always some kind of obstacle in the way that I haven't wanted to expend the effort on hurdling. For example, one year, I really wanted to make a sick Wolverine costume, but the claws were next to impossible to do the way I wanted to, and too expensive for me to justify buying a really good set. So, instead I defaulted to some dumb thing or another, and carried on. One year I did make a really awesome Harry Potter themed costume, but that's basically just finding appropriate clothes. No real creativity is involved. Then, a few years ago, I bought a Bunny Suit, and I was that guy for a while. That was awesome, and really rejuvenated my enthusiasm for the holiday, but the suit has seen better days, and if I'm going to be doing a new costume, I'm going to put some effort into it with more than just my wallet.


Last year, my good friend Curtis built this cardboard Robot costume for some competitions around our town. He went "overboard" with it, and learned a lot about small electronics in the process. He did really well in the competitions, and everyone had a great time with it. This year, he decided to go a step further, and construct a new and improved robot out of sturdier materials, with much more intricate electronics involved. The other day I was at his house and he showed me the costume, and I became inspired.

I don't want to make a robot - I don't think stealing his idea or his thunder is really what kind of person I am. But I do want to take it in a new direction, and make some modifications to the process - and see what kind of craziness I can come up with on my own terms. Curtis has graciously allowed me to utilize any of his resources, including space - since Jen and I have a rather small apartment right now - so the two of us will be brewing largely together on our respective costumes.

Yesterday was day 1 for my costume, although Curtis is much further along in his own development. I'm not entirely sure what my end result will look like, but my inspiration comes from a few sources. First, this site has inspired a lot of what I think is cool. This guy is really a champ when it comes to this style of costume, and I think using his experience in not only the mechwarrior costume, but the other two he has made will allow me to shortcut a lot of the technical inefficiencies he's had over the years of production. I think his style is all there, but I also think my costume will generally be more reminiscent of this one:


On the downside, this guy kinda looks like a choad, and his costume looks cheap and fake. The foam pieces he used to flesh out the suit look exactly like painted foam, which bums me out, and functionally, it doesn't do anything. He just kinda stands there or walks around and looks intimidating. Meanwhile, anything he fights will kill him immediately since his entire body is exposed. Nice abs, though. I think his concept is sound, but we can build it better. We have the technology.

My concept is more robust, and probably bigger. That doesn't make it better, but it will be anyway. Originally, I had planned to make inverted knee legs (like on the mech in the first link) but Curtis pointed out how it takes a large amount of focus away from the costume when you see these really obvious legs, and I agree - so I decided to make my knees bend the right way and will be constructing "stilts" to give me additional height, along with devices to mask my legs.

The upper portion of the costume will consist of three main parts.
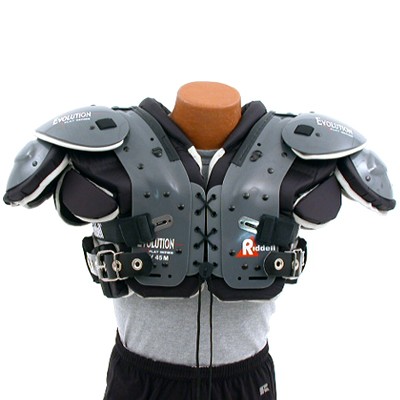
First, I've procured a set of football (American, not 'rest of the world-ian') shoulderpads in order to be able to build forward, back, and up simultaneously. In order to give the structure the right weight distribution, I'm planning to attach a pack frame to the rear of the shoulder pads and expand from that.


Second, the arms will be constructed in a manner that allows them to be permanently attached to the body, but at the same time disconnected. This will give them freedom of movement, but can allow any electrical systems to be powered in the main body, with wires being free to travel out as necessary. This connection consist of, but not be limited to, electrical conduit which gives practicality to the attachment as well as aesthetics.


The third portion of the upper body is the head. My initial plan is to use a welding mask, with the blackout screen removed, for the helmet, and modifying it to fit the theme of the final product. This was the first thing Curtis and I delved into, and so far it is a major success. The tricky part to this will be the power supply to any lighting in the helmet, but even this can be accomplished with the conduit system I'd be using for the arms. Any wires encased in this type of tubing would look entirely appropriate for the costume, and should be secure enough to not be rattled by moving about.


This weekend should bring time for some more construction, and I'll be sure to keep updating as we progress!

Monday, July 20, 2009

Optimist

I just looked over the past few posts, and noticed the general trend of pessimism and negativity that they contain. I don't want to give the wrong impression.
I love my life. Man, it's pretty awesome. I've got to admit that when I look over the lives of the people I know and surround myself with, I wouldn't trade places with any of them. That's not to say that their lives are in any way worse than mine - I'm sure that in their eyes they're right where they want to be - or in some cases are at least trying to get their lives to that stage - but my point is that overall, which is really what counts, I'm happy.
I've been really lax on updating this thing lately, mostly because I only half care, but I don't think its worth writing bullshit if I don't actually feel like I have something to say. So if you're still RSSing this, or reading it some other way, then thanks! In addition to my disinterest in writing, I've been in the middle of moving for the last few weeks. Bret (my roommate from my previous apartment) and I found a house about 10 mins away from our old apartment that is so much nicer than the place we were at that we couldn't allow ourselves to not live there. We'll be joined by Zachary Tartell of Watertown, NY, who is a good friend of ours who is looking to take up the moderate societal upgrade that Syracuse promises. I'll be posting some pics of the new crib at some point in the near future, once we get our stuff all moved in.
Outside the move, not much has been going on outside the normal day-to-day. Unless you count the break-in, I suppose. For those of you not reading the Magic Blog (how many of you are there?), the story is this:
A few Tuesday nights ago, sometime between 11pm and 7am Wednesday, my car was broken into. The thief stole my iPod and a backpack which contained two Magic decks which were chock full of expensive and irreplaceable cards. I'm out approximately $2000. I'm not excited about it, and as it turns out, it's not covered by either my car nor my renter's insurance. This is YEARS of investment and trading and tournament wins and all kinds of work, gone in an instant.

After a week of letting the town's card dealers know, checking eBay constantly, getting the car fixed, buying a new iPod, etc., I get a phone call from a friend who says he's going to make my day. He forwards me a private message on mtgTheSource.com (the website I admin) which says:

Thru a google search I found the post that says "Bret Weed is coming" to some event about a Boston Roll call....I live in Syracuse and found a bag under my front porch with some merchandise in it, for playing wizard games...in one of the pockets I found a card with Bret Weed on it...the bag has broken glass in it, so I am assuming his car was broken into and this was taken...i would like to return it to him... my # is 315-XXX-XXXX...

Thank you
Amy

As I said above, Bret is my roommate. I was borrowing his bag at the time. This woman went out of her way to track down the owner of the bag she found, and managed to find them on a random website - which I happen to be intricately involved with. I called her, and she lived less than a block from my old apartment. She had the bag, with all the cards in it. The assumption is, the thief stole the bag, looked in it, saw nothing of value (to them), and ditched it on the way to wherever they were going. Since this thief threw it under a porch, it was protected from the rain, which persisted the entire week I was missing the cards. I was obviously floored at the generosity and integrity of this benefactor, and made sure to give her some token of my gratitude - although anything I could have given her wouldn't have been enough.

I hope the thief enjoys his new iPod, or the 20 bucks he'll get for it. I'm glad, for my own sake, that he was too stupid to realize that the real value was in the backpack he threw away.

I've often told my closest friends that while some people always claim "My life sucks," I can't say the same - my life doesn't suck, it's just a little annoying sometimes. This is a perfect example. Should my cards have disappeared forever, it would have SUCKED. As it stands, it sucked for a week, and then became altogether better. So I've got that going for me. Which is nice.